Where to start?

Jump to:

Whether you're after pantry labels to sort out your kitchen pantry, or you need some herb and spice labels to help keep your spice jars organsied, you're in the right place. It may be that you need to label your tribe's lunchboxes, so that they don't get lost at school. Or perhaps you have a storage room bursting at the seams with nothing but clutter.... grab some tubs and design your storage labels. No matter what labels you get, you'll be organised before you know it.

Our labels are individually cut letters/words that are transferred onto your intended surface using transfer tape. They are beautifully cut, using your choice of font and colour. Application instructions can be found below, and will also be sent with your order.

So where do you start? When it comes to choosing your labels, it all comes down to personal preference, obviously. But there are some things that may help you with your quest in choosing the right product.

If you’re anything like us here at lulu & you, you want to know exactly what you’re getting when it comes to an online purchase. So that we can help you get a better idea of what you’ll get, we've put together this information page to guide you along the way. It may seem lengthy, but it's worth the read.

Get Your Colour On

We've done our best in trying to accurately portray the vinyl colours that we offer. Unfortunately as each computer screen can slightly vary in the way they present colours, we can never get it 100% right. But at the end of the day, we feel that no matter which colour you pick, you'll love it.

The vinyl we offer comes with a gloss finish.

When choosing a colour for your labels, there are a few things to keep in mind. Firstly, we believe the most important thing is to create contrast. For example, try to avoid putting like colours together, otherwise they may be hard to see/read. A rose gold label on a black surface, is an example of creating a contrast.

Here is an example of the labels being a little hard to see. Although they match in the sense that the silver label matches the silver metal rim (we all love to colour co-ordinate), at the wrong angle the label is a little hard to see. But.... in saying that, it's entirely up to you and your personal taste when it comes to choosing the right colour. We just want to give a little bit of advice where we can, so you get the most out of your labels.

lulu and you label colour wheel permanent

Colours (in order)
Hot Pink / Pale Pink / Dark Blue / Blue / Sky Blue / Aqua / Bright Green / Mint / Red / Orange / Yellow / Black / White / Rose Gold / Silver / Gold

Size 'em Up

Ok.... let's talk about size!

First things first — all sizes are approximate. The list below outlines the sizes we currently offer. 
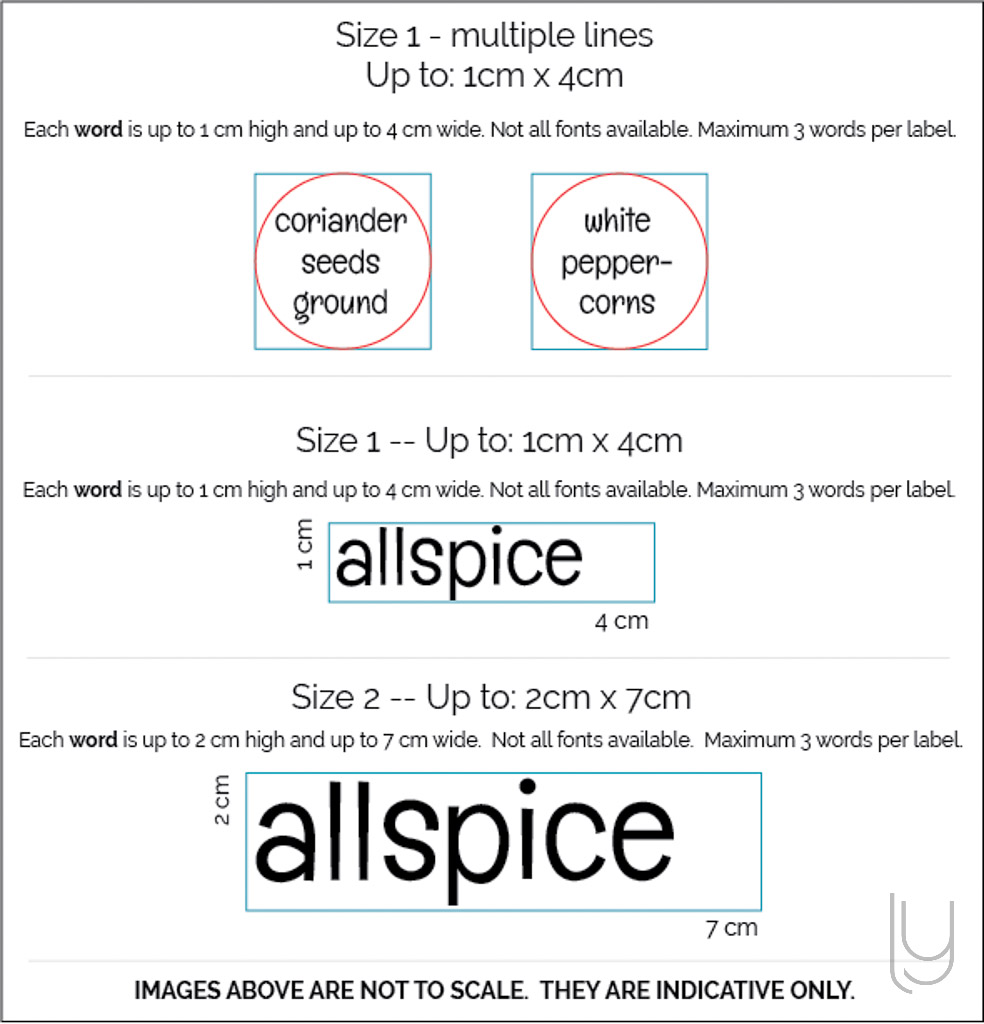
Each size refers to word size, not the finished label size. For our herb and spice labels, pantry labels, school labels, bathroom labels and laundry labels, there is a maximum of 3 words per label (e.g. 'coriander seeds ground'). Wall labels, personalised name labels and storage labels all have a maximum of 2 words per label. Each word of the label will meet the dimensions of the size selected. Words like 'of' or 'and' are not included in word count.

  • Size 1 – Up to 1cm H x Up to 4cm W — herb and spice labels only
  • Size 2 – Up to 2cm H x Up to 7cm W
  • Size 3 – Up to 3cm H x Up to 10cm W
  • Size 4 – Up to 4cm H x Up to 13cm W
  • Size 5 – Up to 5cm H x Up to 16cm W
  • Size 6 – Up to 6cm H x Up to 19cm W
  • Size 7 – Up to 8cm H x Up to 24cm W
  • Size 8 – Up to 10cm H x Up to 30cm W

With each label product we sell, we offer various sizes —although not all items/products will have the same sizes offered. For consistency, all label sizes are referred to in centimetres (cm).

As we’re sure you can understand, it’s unfortunately not as easy as saying “each label will be x wide and y high”. Word sizes will obviously vary depending on the words you’ve 
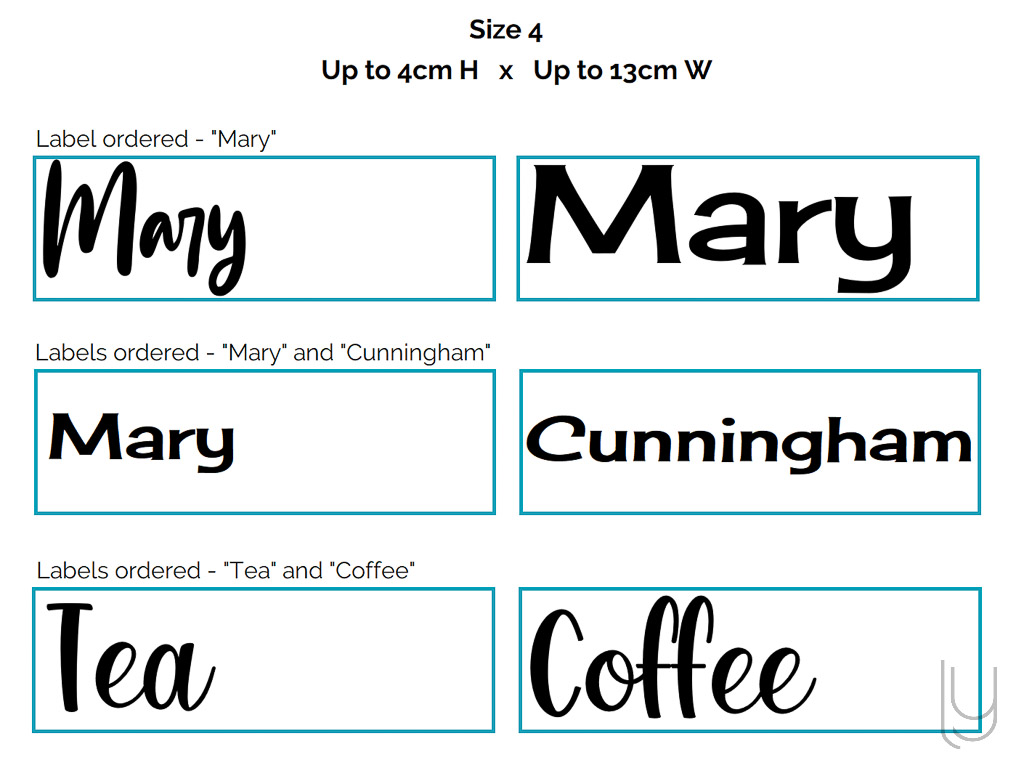
chosen to have cut and the font you have selected. For example, the word “Tea” will have the same height as "Coffee", in the size you've chosen, but will not be as wide. And some fonts are taller/wider than others. We're sure you get the drift here. Keep in mind, the sizing relates to word size not label size.

For any labels where you have chosen multiple word groups (e.g. Coriander, Basil, etc.), the size of all words will be based on the longest/tallest word in the group, to ensure the labels remain consistently sized and within the dimensions of the size you’ve selected.

So when referring to word sizes, we give approximate sizes/dimensions which will hopefully capture a range between the shorter words and the longer words. For example choosing size 4 means that each word will be up to a height of 4cm and have a width up to 13cm. Each word you've chosen within a particular size will look consistent. Look at these examples. Here is another example. We want to make sure you know exactly what you're getting, so if you’re in doubt at all, please feel free to contact us about any queries you may have.

When selecting a font type and size, please ensure you carefully consider the size of the location the label will be placed – both width and height. Use our font previewer to give you an idea of how the fonts will look. Although the previewer is set in one size only, it will help give you an idea of how some letters are taller than others etc.

Stick 'em On

Here you'll find all the information you'll need to prepare and apply your new label/decals. Make sure you read 'til the end so you have all the information you need. It might seem like a lot of information, but it's all so you're armed and ready to go!

What can I put my label on?

Your label/decal can be applied to most flat, smooth surfaces - e.g. glass, plastic, metal, some wood surfaces etc. For best results, ensure you apply your labels as soon as possible.

The important stuff

  1. For best results, ensure you apply your labels as soon as possible.
  2. When choosing your intended surface, please bear in mind that not all surfaces are created equal. Also the smoother the surface, the better. Texture can make it difficult for the decal/label to adhere appropriately.
  3. Take. Your. Time. Go slow, don't rush the process. A little patience and perseverance (which we know you have in spades), goes a long way.

So, now that's out of the way.... let's go!

  1. Decide where you want to place your label and ensure the area is clean and clear of any dust, oil, dirt etc. Ensure what you use to clean the area won’t leave a residue – isopropyl or rubbing alcohol works well.
  2. Your label is sandwiched between the backing paper and the clear transfer tape on top. Place each label (as supplied to you) on a flat surface and apply pressure across the vinyl lettering. This just ensures the label is well adhered to the transfer tape. A credit card can help with this.
  3. When you are ready to apply your label, slowly remove the clear transfer tape from the backing paper, ensuring the label is stuck to the transfer tape. If you notice the label won’t come away from the backing paper, replace the transfer tape and apply pressure to the area of the label that won’t come away.
    • Make sure you don’t forget any dots above letters i and j
    • Once separated, avoid touching the back (sticky side) of the label. Oils from your fingers can compromise the adhesive.
  4. Once you have removed the clear transfer tape from the backing paper, carefully place the transfer tape with label onto your intended surface.
  5. Before removing the transfer tape, apply pressure across the label to ensure it has adhered to the surface. You can use a credit card (or similar) to carefully rub across the label to help with this step. Keep the credit card almost flat while doing this.
  6. Leave the label and transfer tape in place for a minute or two, possibly longer. If in the next step the label continues to come away with the transfer tape, leave it in place for a few hours.
  7. Starting in one corner, slowly peel the clear transfer tape from the surface. Keep the transfer tape low while peeling it back, as if you’re peeling it back on itself. The label should remain on your intended surface. If the label comes away with the transfer tape, replace the transfer tape, apply pressure to the required area, leave it for a while, then try again.
  8. Once you’ve removed the transfer tape, use your fingers to apply a final amount of pressure to the entire label.
  9. Breath...

Please note:

  1. We cannot be held responsible for any errors when applying your label. Remember, patience is key. Take your time.
  2. Labels are waterproof after 24 hours – but handwash only. No soaking or dishwasher use.

Keep 'em Looking Good

In order to keep your labels/decals in tip top condition, we recommend the following:

  • Allow the label/decal to cure to the surface for at least 24 hours before cleaning or immersing in water.
  • Use a soft, non-abrasive cleaning cloth, preferably lint free, to clean the label/decal.
  • Use a warm soapy solution, and wipe/rinse after.
  • Do not clean using a dishwasher or soak — a simple wipe down or handwash is preferred.
  • Do not use abrasive or caustic cleaners on your labels.
  • Not recommended for use near flame/heat source, or with a microwave.